
The Python `turtle` Library - A Step-by-Step Tutorial
The Python programming language, like most languages, is purely text-based. This can make it quite boring for young learners.
Visual tools can be important educational resources. More specifically, the turtle library is a great tool to help elementary and middle school students to master the language.
The turtle library comes with a collection of commands that you can use to create artwork and games.
If you're an elementary or a middle school student with the desire to learn Python (or an educator who is serving that audience), you’ve come to the right place.
This tutorial will help you start your Python programming journey by creating shapes and images using the Python turtle library.
Table of Contents
You can skip to a specific section of this Python turtle tutorial using the table of contents below:
What is the turtle Library?
The Python turtle library is a library that provides programmers with a virtual canvas to create shapes and images.
To draw the shapes and images, you use an onscreen pen called the turtle. The name of the library was derived from the name of this pen.
The Python turtle library is a useful learning tool because it helps programmers realize that Python is an interactive programming language. The turtle library lets your see how fun it is to learn Python!
Because of this, turtle is often used to introduce children to programming.
Although it is a straightforward library, it provides a versatile way of learning the Python concepts. It acts as a stepping stone for kids when starting their journey in Python programming.
So, is the Python turtle library only meant for kids?
Definitely not!
It’s also a good library for adults who are beginners to Python programming.
With the turtle library, you can create different shapes and images in Python.
Let me show you how you can get started with the Python turtle library…
Getting started with turtle
Before going further, there are two important points for you to note:
-
Python environment
The
turtlelibrary is shipped with Python.So, if you’ve installed Python on your computer, you already have
turtle.This means that you won’t be required to install the library separately.
To write and run your code, you can use applications like IDLE or Jupyter Notebook.
However, if you are not familiar with them, you can use REPL.
-
Python version
Install the latest version of Python on your computer, Python 3.X.
Since the library is pre-installed in Python, you only need to import it.
You can use the import statement for this.
Let me show you how:
import turtleThe above command will import the
turtlelibrary into your program.You can then use it to create shapes and images.
turtle is a graphical library. This means you will need to create a separate window to carry out each drawing command.
This window is known as the screen.
The easiest way to create the screen is by initializing a variable for it.
In Python, variables help us store information that we need to access later.
A Python variable is said to have been initialized once it has been assigned an initial value.
The value of a variable is not constant. It can change many times during program execution.
Here's how you can create your turtle screen and assign it to a variable called screen:
screen = turtle.getscreen()To reiterate, we’ve created a variable and given it the name screen.
We have then called the .getscreen() Python function from the turtle library.
This is the function that generates the screen for us.
So, anytime you call the screen variable, you will be referring to the generated screen.
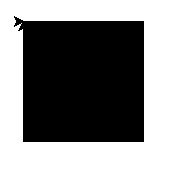
When you run the code, a separate will pop up as shown below:
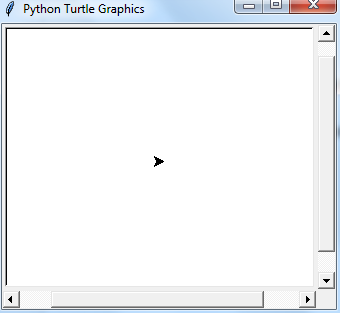
The output of your code will be displayed on this screen.
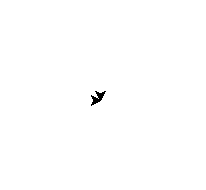
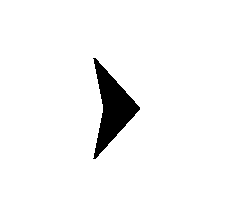
Notice that there is a small black triangle at the center of the screen.
This is called the turtle.
The next thing we need to do is initialize a variable that you will use to refer to the turtle.
We will give this variable the name tt, which is a common practice when working in the turtle library.
The creating of this tt variable is shown below:
tt = turtle.Turtle()Congratulations!
You have now create both the screen and the turtle.
See the screen as a canvas and the turtle as a pen. You can code the turtle to move to any place on the screen.
The turtle has characteristics such as color, size, and, speed that you can change. The turtle points in a particular direction and will always move in that direction unless you instruct it otherwise.
Here are two things you should keep in mind about the turtle:
- When it is up, it will not draw any line when it moves.
- When it is down, it will draw a line when it moves.
We will see this in practice soon. Next, I will show you how to program using the turtle library. Let’s continue…
How to Program with turtle
Now, it’s time to get into real coding.
I want to show you how to perform various programming tasks using the turtle library.
First, I will be showing you how to…
Move the turtle
You can move the turtle in the following four directions:
- Forward
- Backward
- Left
- Right
To move the turtle forward or backward, you need to call the .forward() and .backward() functions respectively.
The direction to which the turtle moves depends on the direction it is facing.
To change the direction of the turtle, you can use the .left() and the .right() functions.
When calling these functions, you must specify the number of degrees by which to move the turtle.
Let’s see the turtle move…
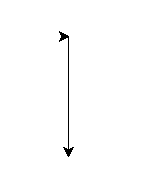
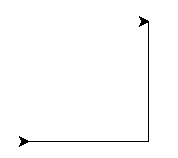
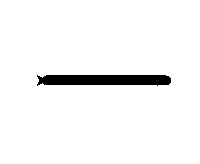
To move the turtle 90 degrees to the right, run the following command:
tt.right(90)The command will change the turtle to look as follows:
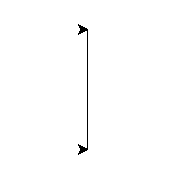
Next, let’s move the turtle forward by 120 units.
Simply run the following command:
tt.forward(120)The turtle should now look as follows:
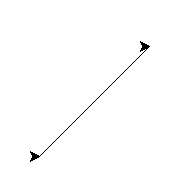
Next, let's see the turtle move 90 degrees to the left:
tt.left(90)The turtle should now look as follows:
We can now move the turtle backward by 120 units:
tt.backward(120)The turtle should look as follows:
So, the turtle first turned right by 90 degrees, moved forward by 120 units, turned left by 90 degrees, then moved backwards by 120 units.
Simple!
Also, you can use the commands in their short form.
This is shown below:
tt.rt()fortt.right()tt.fd()fortt.forward()tt.lt()fortt.left()tt.bk()fortt.backward()
The use of degrees makes it possible for us to draw a line from the current position to any arbitrary position on the screen.
Consider the figure given below:
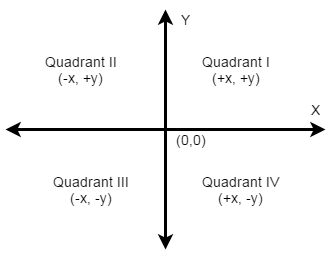
The above figure shows how the screen is divided into four quadrants.
At the beginning of your program, the turtle is located at the position marked as (0,0).
This position is also known as Home.
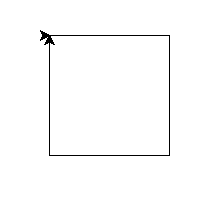
If you need to move the turtle to any area of the screen, you can use the .goto() function.
The function expects you to pass the coordinates to which you need to move the turtle.
For example:
tt.goto(110,110)The above command should move the turtle as follows:
The output shows that you have drawn a line from the point (0,0) to the point (110,110).
You can bring the turtle back home by running the following command:
tt.home()Drawing Shapes
You now know how to move the turtle.
In this section, I will be showing you how to draw shapes.
First, I will show you how to draw polygons because they are simple.
Polygons are made up of many straight lines connected at particular angles.
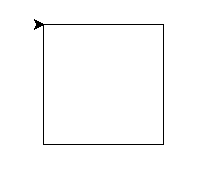
Consider the following code:
import turtle

screen = turtle.getscreen()

tt = turtle.Turtle()

tt.fd(120)
tt.rt(90)
tt.fd(120)
tt.rt(90)
tt.fd(120)
tt.rt(90)
tt.fd(120)
The code should generate the following:
The code generated a square, a type of polygon!
With such an approach, you can program the turtle to generate different types of shapes.
You only have to vary the number of sides and their length.
Drawing Preset Figures
The turtle library makes it easy for you to draw certain types of figures.
A good example is the circle.
It’s not easy for you to draw a circle using the previous approach.
However, you can issue a simple command to draw the shape.
This is demonstrated below:
tt.circle(80)The command should return the following output:
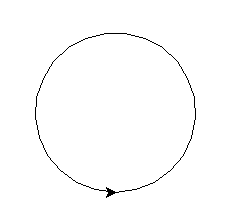
So, the output is a circle.
We used the .circle() function and passed to it the value 80.
The 80 is the number of units for the circle radius.
To increase or decrease the size of the circle, you simply have to change the value of the radius.
You can also draw a dot, which is just a circle that is filled up.
For example:
tt.dot(30)This returns the following output:

So, we simply called the .dot() function and passed to it a value of 30.
The 30 is the value for the diameter of the dot.
Awesome!
You now know how to create shapes using the turtle library.
But how can you customize your shapes to look the way you want? That’s what I will be showing you next.
Keep reading!
Customizing turtle Shapes
Let me show you how to customize your turtle shapes. We will consider factors like the screen color, screen title, pen size, etc.
By default, turtle launches its screen with a white background color. However, you can change this color using the .bgcolor() function as shown below:
turtle.bgcolor("green")The command should change the background color of the screen to green as shown below:
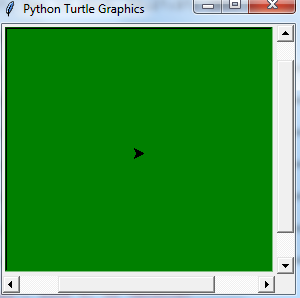
Note that you can replace the green with any color of your choice.
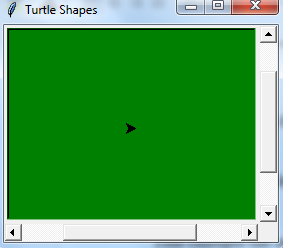
You must have noticed that the turtle screen comes with a default title, that is, “Python turtle Graphics.”
You can however change this title using the .title() function. For example:
turtle.title("Turtle Shapes")This changes the screen title as shown below:
It’s also possible to change the size of the turtle by making it either bigger or smaller.
The size of the shape will change but the output of the pen while drawing on the screen won’t change.
We use the .shapesize() function for this.
The function takes the following 3 parameters:
- Stretch length
- Stretch width
- Outline width
For example:
tt.shapesize(10,5,2)The turtle should now appear as shown below:
In the previous command, the thickness of the pen did not change.
You can change it using the .pensize() function. For example:
tt.pensize(10)The thickness of the pen has been set to 10.
Now, let’s draw using the pen:
tt.forward(120)This returns the following:
The pen is now much thicker that the original pen.
When you launch a new screen, the turtle is displayed in black color. When you begin to draw, the pen draws with black ink.
You can change this to any color you want. First, let us increase the size of the turtle. We want to see the color difference more clearly:
tt.shapesize(4,4,4)Now, we can use the .fillcolor() function to change the color of the turtle:
tt.fillcolor("red")This is what you will get:
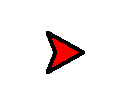
The turtle now has a red color.
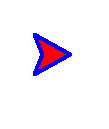
To change the pen color, use the .pencolor() function as shown below:
tt.pencolor("blue")You should now have the following turtle:
To make things easier for you, you can change the color of both at once.
You simply call the .color() function as shown below:
tt.color("blue", "red")Image Coloring
Everybody likes colored images. Fortunately, the turtle library allows you to easily color your images.
This is possible using the .begin_fill() and end_fill() functions:
- The
.begin_fill()tells the program that you need to draw a closed shape that should be filled in. - The
.end_fill()tells the program that you’re done with creating the shape and that it can now be filled.
Here is an example:
import turtle

screen = turtle.getscreen()

tt = turtle.Turtle()

tt.begin_fill()
tt.fd(120)
tt.rt(90)
tt.fd(120)
tt.rt(90)
tt.fd(120)
tt.rt(90)
tt.fd(120)
tt.end_fill()
The code will generate a square that is filled with solid color.
This is shown below:
Anytime that you want to reset the environment, just call the .reset() function as shown below:
tt.reset()Using Loops
As you advance your Python programming skills, you will encounter Python loops. I will show you how to integrate Python loops with the turtle library in this seciton.
First, let's begin with a broad overview of how Python loops work. Loops are instructions that are executed repeatedly until a particular condition is met.
There are two main types of loops in Python - the for loop and the while loop. We will discuss each type of loop in this tutorial.
for Loops
Remember the example of creating a square? To do this, we had to repeat a line of code 4 times.
Here's waht the code looked like:
tt.fd(120)
tt.rt(90)
tt.fd(120)
tt.rt(90)
tt.fd(120)
tt.rt(90)
tt.fd(120)
You can make the code much shorter (and more readable) using a for loop. For example:
import turtle

screen = turtle.getscreen()

tt = turtle.Turtle()

for x in range(4):
 tt.fd(120)
 tt.rt(90)
In the for statement, we created a variable and given it the name x.
The value of this variable should be between 0 and 4 (excluding 4).
So, the for loop will terminate the program when the value of x reaches 4.
This means that the for loop will iterate 4 times - once for 0, 1, 2, and 3.
The two lines added under the for loop, tt.fd(120) and tt.rt(90), will be executed 4 times, - once for each iteration.
So, for each iteration, the turtle will move 120 units then turn right by 90 degrees.
After doing that 4 times, it will form a square as shown below:
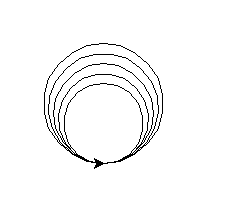
while Loop
The while loop performs a task as long as a specified condition is true. If the condition becomes false, the program terminates.
Here's how you could use a while loop along with the Python turtle library:
import turtle

screen = turtle.getscreen()

tt = turtle.Turtle()

x=60
while x >= 40:
 tt.circle(x)
 x = x-5
The code will create 5 circles.
We’ve used the variable x as a counter variable. The value of this variable starts at 60 and ends at 40, and it should reduce by 5 after each iteration. Each iteration generates a new circle.
The value of variable x has been used as the radius when drawing the circles. Since the value is decreasing, each circle will be smaller than the previous one.
This creates a wonderful spiral effect, as shown below:
Congratulations!
That’s the power of the turtle library.
Final Thoughts
In this article, I introduced you to the Python turtle library and showed you how you can use it to create drawings and visualiuzations in Python.
Here is a brief summary of the topics we discussed in this tutorial:
turtleis a Python library for creating shapes and images.- The
turtlelibrary often acts as a stepping stone for children or other new programmers when learning Python. - The
turtlelibrary is pre-installed in Python. This means that if you install Python in your computer, you will automtically receive theturtlelibrary. - The
turtlelibrary comes with some preset figures such as the circle. - To avoid repeating lines of code when drawing shapes and images, combine
turtlewith loops.