
In the last section of this course, you had your first introduction to convolutional neural networks.
You learned the types of problems they're used to solve, their history (and the influence of Yann Lecun), and an example of an image that would be difficult to classify using an artificial neural network.
You have yet to see why convolutional neural networks have earned their name. Their name comes from the first step in building a convolutional neural network - convolution.
This tutorial will explain to you what convolution means and why it is important when building and training convolutional neural networks.
Table of Contents
You can skip to a specific section of this deep learning convolution tutorial using the table of contents below:
- What is a Convolution?
- Convolutions As The First Step in Convolutional Neural Networks
- Strides and Convolutions
- Interpreting A Feature Map
- Final Thoughts
What is a Convolution?
A convolution is a mathematical function that is defined as follows:
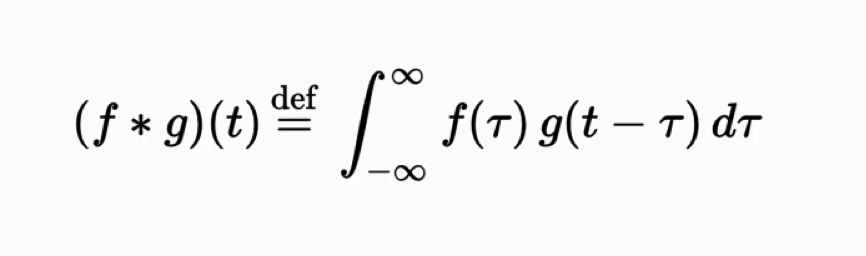
Note that this is an integration with respect to tau, not with respect to t.
While it might not be clear from the equation itself, the convolution function is used to express how the shape of one function is modified by the other. The convolution function has applications in probability, statistics, differential equations, and - of course - convolutional neural networks in deep learning.
Convolutions As The First Step in Convolutional Neural Networks
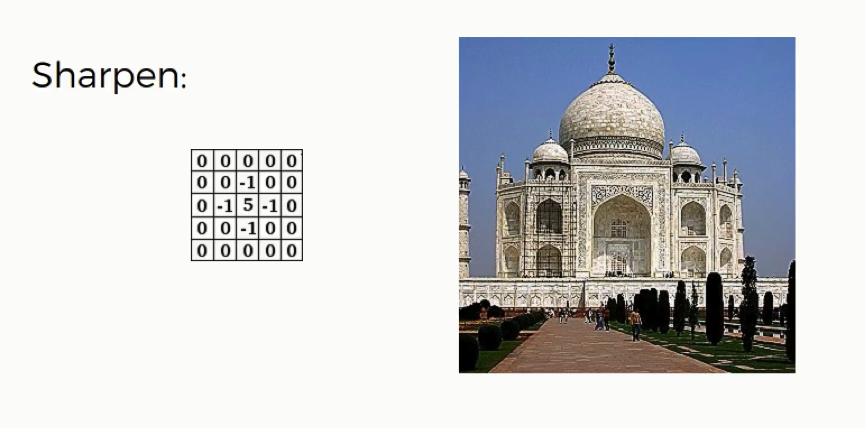
Convolutions are used as the first step in building a convolutional neural network. More specifically, they are used to transform an input image into a feature map using a feature detector.
Each of these items - the input image, the feature detector, and the feature map are arrays.
In terms of vocabulary, it should be noted that there are other terms for the items described above. The feature detector is also sometimes called the kernel or the filter. Similarly, the feature map is sometimes called the convolved feature or activation map.
Let's start by considering the two inputs in a convolution - the input image and the feature detector. They look like this:
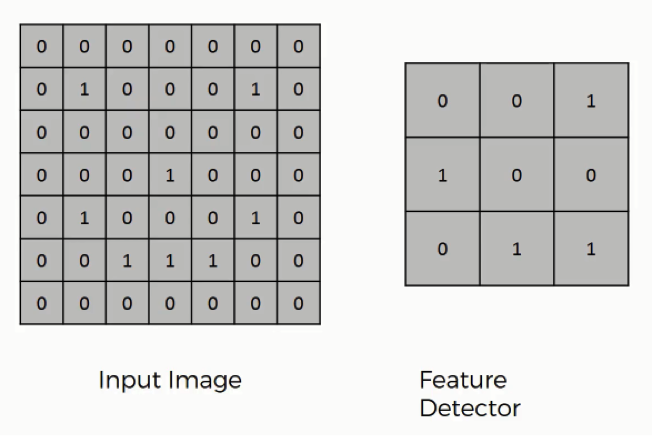
The feature detector is often a 3x3 matrix, although it can also be a 5x5 matrix or a 7x7 matrix (or even other variants). We will stick with the 3x3 example in this tutorial.
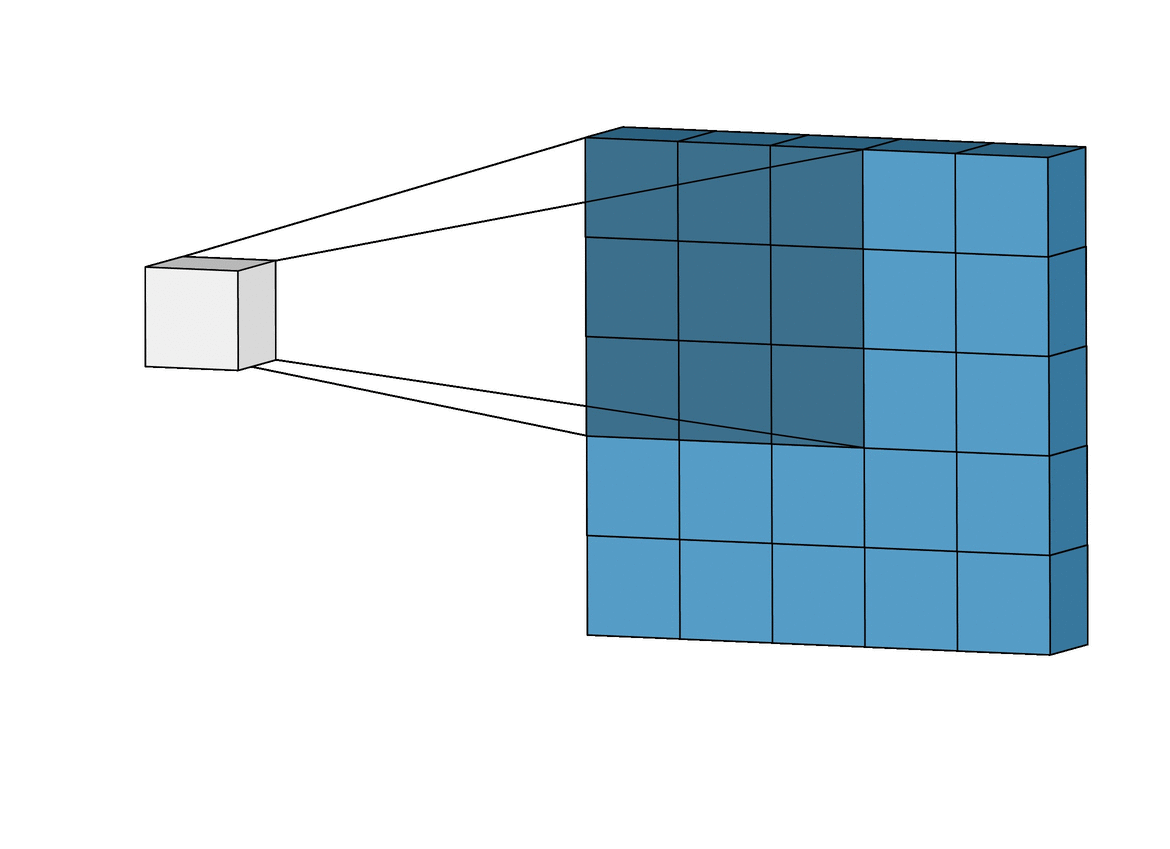
The way that the input image and the feature detector are integrated to generate the feature map are as follows:
- The
feature detectoris overlaid in the top-left corner of theinput image. - The number of cells that match between the
input imageand thefeature detectorare counted. - This number is added to the top-left cell of the
feature map. - The
feature detectoris moved to the right by one column, and the process is repeated. Once thefeature detectorhas been moved all the way to the right of the image, it is shifted down by one row.
Here is a visual example that is very helpful in understanding how convolution is used to generate the feature map:
And here is the finalized feature map from our previous example:
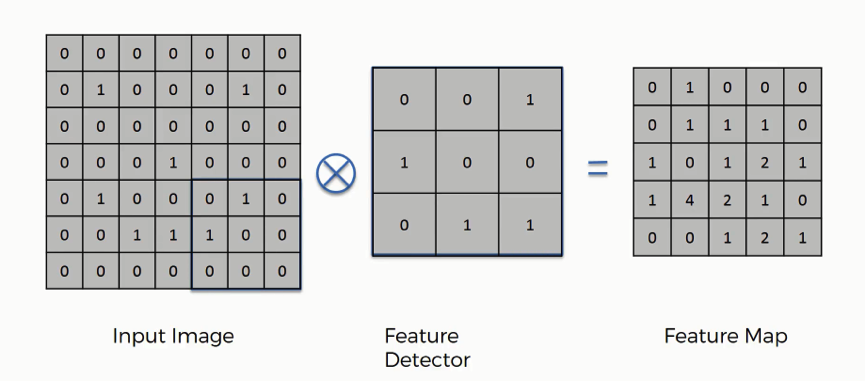
Using the example above, work through a few example placements to make sure that you understand how the convolution calculations are performed!
Strides and Convolutions
In the example that we worked through earlier in this tutorial, we moved the feature detector by one column every iteration. We also moved it down one row once it reached the end of its row.
This value of 1 is called the stride of the convolution, and it doesn't need to be 1. You could use a stride value of 1, 2, 3, or higher - especially when working with larger images. It is generally considered convention to use a stride value of 2 when building and training convolutional neural networks.
We will revisit stride values later in this tutorial.
Interpreting A Feature Map
You saw earlier in this tutorial that convolution can be used to generate a feature map, like this:
How should you interpret the output of this convolution?
Well, this convolution process serves two main purposes:
- It reduces the size of the image: as you can see, the
feature mapis smaller than theinput image. This makes it easier to process. Our iterations will run faster as a result. - It allows the neural network to focus on specific features in an image: for facial recognition, these features might include a nose or an eye
In practice, many different feature maps are generated within a convolutional neural network to account for the various features you're looking for in an image. The following image illustrates this nicely:
This will become more clear as we build and train a real convolutional neural network later in this course.
Final Thoughts
This tutorial introduced you to the convolution function and its role in building convolutional neural networks.
Here is a brief summary of what we discussed in this tutorial:
- The mathematical definition of a convolution
- How convolutions are combined with matrix overlays to act as the first step in building a convolutional neural network
- The role of an
input image, afeature detector, and afeature mapin a convolutional neural network - What a
stridemeans when training a convolutional neural network - How to interpret a convolutional neural network's
feature map