
How to create an Installable Django App
Django project is a collection of codes and configuration files for a particular website. Django groups business logic into what it calls apps, which are the modules of the Django framework. In this article, we talk about how to package an app to make it installable after taking it out of Django project. Once you packae your app, you can share it on PyPI so that others can fetch it through pip install.
Table of Contents
You can skip to a specific section of this Python regular expression tutorial using the table of contents below:
- How to create an Installable Django App?
- Prerequisites
- Perform App Testing
- Using Setup.cfg to define your installable package
- Final Thoughts
How to create an Installable Django App
Django is renowned for its fully managed application framework. An app can be developed as a fully independent module for each feature. In the context of Django, a project refers to the set of configuration files and code for a specific website or application. There is ample documentation on how to arrange your projects and applications within them. However, it is difficult to find relevant information when it comes to packaging an installable Django app.
This tutorial covers them all and will also guide you on how to create an installable Django App. Here, you can also find its best practices together with practical guidance including respective coding patterns. You can share your app on PyPI once it has been packaged so that anyone can retrieve it by installing the pip (pip install).
Make sure to follow the below steps with the provided examples.
Prerequisites
Having some familiarity with Django, pip, PyPI and Pyenv (or similar Virtual environment tool) will be beneficial for following this tutorial but not compulsory. Some pre-downloaded stuff will be required. It is recommended to Install the corresponding versions of them with the help of the official Django documentation. The Python Package Index (PyPI) is a Python programming language software repository that allows you to find and install Python-specific community applications.
Meet Pyenv: A tool for handling multiple Python versions. Pyenv, previously referred to as Pythonbrew, lets you modify Python's global version, install multiples versions of Python, set Python's unique project directory versions and focus on creating Python's virtual environments which are called ("virualenv's").
Starting with a sample Django App
At the time of writing this tutorial, the most recent version of Django was 3.1.6 and Python 3.9 was used to complete all testing. None of the steps in this tutorial will be incompatible with earlier versions of Django as these techniques are used since Django 1.8. Even so, some modifications will be required if you are using Python 2. Python 3.7 is assumed across the codebase in order to keep the examples simple.
Start from scratch to develop the Django project
The Django Admin command and a few minor edits were used to create the sample project and receipts app. The Django admin is essentially a web interface for managing database models which enables to build, access, update and delete data in its interface as well as to perform some special data-related activities. Start creating the sample project by using the following code in a clean virtual environment:
Install Django
pip install django
Create a project named test_project using the following command
django-admin startproject Test_project
Navigate to that project using
cd Test_project
Use the following command to access the server
python manage.py runserver
Then, to start app use
python manage.py startapp polls
The above commands will create the ‘Test_Project’ project directory, file structure and a receipt application subdirectory that will contain template files you will use to construct the installable Django application.
Then, do the following modifications to the sampleProject / settings.py file
· Add '127.0.0.1' to the ALLOWED_HOSTS setting so that you can test locally.
· Add 'booking' to the INSTALLED_APPS list.
The settings.py file is the basic configuration file for all Django projects. You have already been working in the design of Django frameworks, databases, models and middleware for a set of variables in previous chapters, amongst other items.
Furthermore, you need to register the URLs of receipts app in the TestProject / urls.py file. To do that, add the path (‘polls/’, include (‘polls.urls’) to the urlpatterns list ).
Quick View of the polls sample App
Two ORM model classes called question and choice are used to implement the app. Object-relational mapping is a programming technology for translation of data between incompatible typical systems using object-orientated programming languages. This generates a "virtual object database" from which programming can be used. The question class requires a charfield with a maximum length of 200 characters. A DatetimeField is included in the publish field. The choice class is a point of collection for objects. This is done by a ForeignKey on the question that is pointed to choice.
 import datetime

from django.db import models
from django.utils import timezone
from django.utils.encoding import python_2_unicode_compatible


@python_2_unicode_compatible
class Question(models.Model):
    question_text = models.CharField(max_length=200)
    pub_date = models.DateTimeField('date published')

    def __str__(self):
        return self.question_text

    def was_published_recently(self):
        now = timezone.now()
        return now - datetime.timedelta(days=1) <= self.pub_date <= now

    was_published_recently.admin_order_field = 'pub_date'
    was_published_recently.boolean = True
    was_published_recently.short_description = 'Published recently?'


@python_2_unicode_compatible
class Choice(models.Model):
    question = models.ForeignKey(Question, on_delete=models.CASCADE)
    choice_text = models.CharField(max_length=200)
    votes = models.IntegerField(default=0)

    def __str__(self):
        return self.choice_text
The model objects provide you with database content. A brief view of Django returns a JSON dictionary with all the polls Objects in the database:
JSON is fast since it is explicitly designed for data sharing. JSON encoding has been terse, requiring less transit bytes. Moreover, JSON parsers are less complicated, consuming less time and overhead for processing.
from django.http import JsonResponse
from polls.models import choice

def choice_json(request):
    results = {
        "polls":[],
    }

    for choice in choice.objects.all():
        line = [str(choice), []]
        for question in choice.question_set.all():
            line[1].append(str(question))

        results["polls"].append(line)

    return JsonResponse(results)
The choice_json() view iterates through all the choice objects and generates a pair of choice objects plus a list of the item objects included in it. All these are put in a dictionary and returned via the JsonResponse() method from Django.
You use an admin.py file to register the models and make them accessible in the Django admin interface:
 from django.contrib import admin

from .models import Question, Choice
class ChoiceInline(admin.TabularInline):
    model = Choice
    extra = 3


class QuestionAdmin(admin.ModelAdmin):
    fieldsets = [
        (None,               {'fields': ['question_text']}),
        ('Date information', {'fields': ['pub_date'], 'classes': ['collapse']}),
    ]
    inlines = [ChoiceInline]
    list_display = ('question_text', 'pub_date', 'was_published_recently')
    list_filter = ['pub_date']
    search_fields = ['question_text']
admin.site.register(Question, QuestionAdmin)
The above code generates a Django Model Admin for each choice and question class and registers them with the Django admin.
Finally, a file called urls.py registers a single view URL in the app:
from django.conf.urls import url

from . import views


app_name = 'polls'
urlpatterns = [
    path("choice_json/", views.choice_json),
]
Now you can include polls/urls.py in your project url.py in order to make the receipt view available and display on your website.
In the end, you can run ./manage.py makemigration polls, use the Django admin for adding data and then visit /polls/choice_json/ to see the results.
$ curl -sS http://127.0.0.1:8000/polls/choice_json/ | python3.9 -m json.tool
{
    "polls": [
        [
            "Choice(id=1)",
            [
                "question(id=1, description= Have you tried R tools for Visual Studio? )",
                "question(id=2, description=How do you commute to work/school? )"
            ]
        ],
        [
            "Choice(id=2)",
            [
                "question(id=3, description=What is your favourite season?)",
                "question(id=4, description=What is your current role?)"
            ]
        ]
    ]
}
The above block uses curl to visit the choice_json view which results in a JSON response and contains the choice objects and their respective question objects.
Perform App Testing
Django challenges Python's unit test package by enabling you to preload database tools and conduct the testing with its own testing features. The polls app specifies a tests.py file and a test fixture. This test is not exhaustive, but it is sufficient proof of concept:
import datetime

from django.urls import reverse
from django.utils import timezone
from django.test import TestCase

from .models import Question

class QuestionModelTests(TestCase):
    def test_was_published_recently_with_future_question(self):
        """
        was_published_recently() returns False for questions whose pub_date
        is in the future.
        """
        time = timezone.now() + datetime.timedelta(days=30)
        future_question = Question(pub_date=time)
        self.assertIs(future_question.was_published_recently(), False)
Two choice objects and four corresponding question objects are created by the fixture. Object serialization in the database is the Django test fixture. The following JSON code generates artifacts for testing with choice and questions:
You can test the polls app using the Django manage.py command as shown below.
Shell :
$ ./manage.py test
Creating test database for alias 'default'...
System check identified no issues (0 silenced).
.
Ran 1 test in 0.013s
OK
Destroying test database for alias 'default'...
By Running manage.py test, you can run and display the results of an individual test defined in polls/tests.py.
Developing the Installable Django App
You can zip up and distribute the polls/directory, but that's limiting up to some extent. Instead, you want to package the app so that it can be installed.
The major obstacle for creating an installable Django app is the fact that Django expects a project. In Django, an app without a project is Simply a directory with code. Django is unable to do anything with your code such as running tests if there's no project.
Moving your Django application out of the Project
Having a sample project around is a good idea since it helps you to run the Django dev server and play with a live version of your app. This sample project will not be included in your application package, but it can still reside in the repository. You can start packaging your Django installer app by moving it to a directory following this idea:
Shell :
$ mv polls ..
below is how the directory structure looks like:

In order to package the app, you should shift it out of the project. So the first step is to shift it. It will be better to keep the original project around for testing purposes, but it won’t be included in the resulting package.
Django Bootstrapping Outside of a Project
Since your application is now outside the Django project, you have to tell Django how to locate it. You have to run the Django shell that will locate your app or run your migrations if you want to test your App. For that, you will have to set up and make Django available.
The settings.configure() and django.setup() of Django are essential for communicating with your application outside the project. The Django documentation provides more detail on these calls.
You will need this Django configuration in many locations, so defining it in a function makes sense. Create a file named boot django.py including the below code:
# boot_django.py
#
# to setup and configure, we use this file. Which is used by scripts
# that must run on a Django server as if it was running.
import os
import django
from django.conf import settings

BASE_DIR = os.path.abspath(os.path.join(os.path.dirname(__file__), "polls"))

def boot_django():
    settings.configure(
        BASE_DIR=BASE_DIR,
        DEBUG=True,
        DATABASES={
            "default":{
                "ENGINE":"django.db.backends.sqlite3",
                "NAME": os.path.join(BASE_DIR, "db.sqlite3"),
            }
        },
        INSTALLED_APPS=(
            "polls",
        ),
        TIME_ZONE="UTC",
        USE_TZ=True,
    )
    django.setup()
The Django environment is configured by lines which contain settings.configure() and django.setup(). The settings.configure() call contains a list of parameters similar to those specified in the settings.py file. Anything you will need to execute your app will be passed to settings.configure() from the .settings.py file.
The above-mentioned code is a fairly stripped configuration. The polls app does nothing with sessions or templates, so INSTALLED APPS needs only "polls" and you can skip any definitions in middleware. The USE_TZ=True value is required, as there is a time stamp on the choice model. Otherwise, the test fixture would be difficult to load.
Commands Running with Django's Installable App
You can now run any Django management command with a very short script since you have boot django.py:
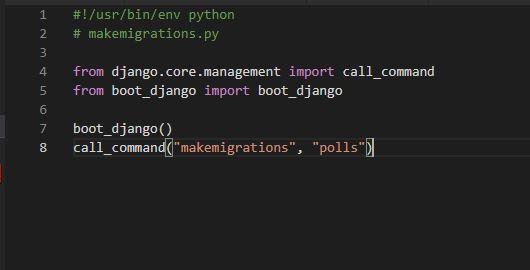
Django enables you to call management commands programmatically via callcommand(). Now you can import and call bootdjango() followed by call_command() to run any management command.
Your application is outside the project now, so that you can perform any Django-y things to it. Below are four utility scripts that are often defined:
- load_tests.py to test the app
- makemigrations.py to create migration files
- migrate.py to perform table migrations
- djangoshell.py to spawn a Django shell that’s aware of your app
Perform testing with your Installable Django App
The load_test.py file can be as simple as the makemigrations.py script, however, then it will only be able to run all tests at the same time. You can pass command-line arguments to the test runner with a few additional lines to be able to perform selective testing:
#!/usr/bin/env python
# here we load_tests.py
import sys
from unittest import TestSuite
from boot_django import boot_django

boot_django()

default_labels = ["polls.tests", ]

def get_suite(labels=default_labels):
    from django.test.runner import DiscoverRunner
    runner = DiscoverRunner(verbosity=1)
    failures = runner.run_tests(labels)
    if failures:
        sys.exit(failures)

    # called for setuptools and return testsuite
    return TestSuite()
DiscoverRunner of Django is a test discovery class supported by Python’s Unit test. It configures the test environment, builds test suites, set up databases, runs the tests, and after that tears everything down. The getsuite() line of the above code, receives a list of test labels and calls the DiscoverRunner on them directly.
This script is similar in functionality to the Django management command test. The main block passes any command-line arguments to getsuite(), and if there are none, then it passes in the test suite for the app, polls.tests. With a test label argument, you can now call loadtests.py and run an individual test.
if __name__ == "__main__":
    labels = default_labels
    if len(sys.argv[1:]) > 0:
        labels = sys.argv[1:]

    get_suite(labels)
Using Setup.cfg to define your installable package
You need to package your Django application first in order to put it on PyPI as an installable Django application. You need to create a setup.cfg file and a setup.py file at the same directory level as the polls directory.
You need to make sure that you have some documentation before diving into it. A project summary can be added in the setup.cfg that displays automatically on the PyPI project page. Make sure that you include a README.rst or similar file containing information about the package.
By default, PyPI stands for reStructuredText format, but it is also capable of handling Markdown with additional parameters:
[metadata]
name = Test_project
version = attr: src.VERSION
description = Polls app for questions and choices
long_description = file: README.rst, CHANGELOG.rst, LICENSE.rst
keywords = one, two
license = BSD 3-Clause License
classifiers =
    Framework :: Django
    License :: OSI Approved :: BSD License
    Programming Language :: Python :: 3
    Programming Language :: Python :: 3.5

[options]
zip_safe = False
include_package_data = True
packages = find:
scripts =
    bin/first.py
    bin/second.py
install_requires =
    requests
    importlib; python_version == "3.9"
This configuration.cfg file defines the package you are going to create. The 6th line uses the file:directive to read the instructions of README.rst file. It means that you have to write a long summary in two places.
The install_requires line of the above code tells any installer like the pip installer about the dependencies of your app. You will always try to make your Django installable App compatible with the minimum supported version of Django.
You can add a testsrequire = entry if your code has any dependencies that are important just to run the tests. For an instance, it was popular using testsrequire = mock>=2.0.0 in setup.cfg, before mock was introduced to the standard Python Library.
Now you are so close to building the package for your Django app installer. Your sample project makes it very easy to test it and thereby indicates the importance of keeping a sample project. The install pip command supports packages which are locally defined. You can use this to ensure that your app still runs with a project. However, One alert is that, in this case, setup.cfg will not work on its own and a shim version of setup.py will also need to be created.
This script uses the setup.cfg file automatically. Now, a local editable version of the package can be installed to test it using the sampleproject. Add the below requirements.txt file in the sampleproject directory:
# requirements.txt
-e ../../django-polls
The -e informs Pip that the installation can be modified locally. You are now ready to install:
Shell :
$ pip install -r requirements.txt
Once you run the application, you will see the following output.

Final Thoughts
Django applications depend on the project structure of the Django framework, so you have to make some extra steps to package them separately. In this article, you learned how to create an installable Django application by moving it out of the project, packaging it and sharing it on PyPI.