
How to Use Celery and Django to Handle Periodic Tasks
Django is one of the world's most popular web application frameworks.
Running periodic tasks is an important part of web application development. For example, you might want to periodically check all users for late payments, and email a polite reminder to users that haven't paid.
Django does not include any built-in functionality for handling periodic tasks. To perform periodic tasks, you'll need to rely on Celery.
This tutorial will teach you how to use Celery and Django to handle periodic tasks in a Django project.
Table of Contents
What is Celery
Celery is a background job manager that can be used with Python. Celery is compatible with several message brokers like RabbitMQ and Redis. The core Django framework does not provide the functionality to run periodic and automated background tasks. Celery comes into play in these situations allowing us to schedule tasks using an implementation called Celery Beat which relies on message brokers.
Some examples of scheduled tasks are
- Batch email notifications
- Scheduled maintenance tasks
- Generating periodic reports
- Database and System snapshots
The Celery projects describe itself as follows.
Celery is an asynchronous task queue/job queue based on distributed message passing. It is focused on real-time operations but supports scheduling as well. The execution units called tasks are executed concurrently on one or more worker servers using multiprocessing, Eventlet, or gevent. Tasks can execute asynchronously (in the background) or synchronously (wait until ready).
In this tutorial, we are going to take a look at how to configure a simple scheduled task in a Django project.
Getting Started
First, We'll create a Python virtual environment and install the packages mentioned below in an Ubuntu environment. Then we will create a Django project called “simpletask”.
- Django Framework
- Celery
- Redis
Creating a virtual environment
python3 -m venv celerytest
cd celerytest

ls
source ./bin/activate
RESULT

Installing Django framework
pip3 install djangoRESULT

Installing Celery
pip3 install celeryRESULT

Installing Redis Next, we will download the latest stable Redis package and build it.
wget http://download.redis.io/redis-stable.tar.gz
tar xzf redis-stable.tar.gz
cd redis-stable
sudo make install
RESULT

After completing the make operation, we start the Redis server as a demon and test it.
redis-server --daemonize yes
redis-cli ping
RESULT

Finally, let us install the Redis pip package
pip3 install redisRESULT

Creating the Django project
django-admin startproject simpletask
tree simpletask
RESULT

Setting up Django Project
In this section, we will cover how to incorporate Celery into the Django project “simpletask”. Let us create a celery.py file in the main Django project directory. This module is used to define the celery instance.
simpletask/celery.py
from __future__ import absolute_import, unicode_literals
import os
from celery import Celery

# set the default Django settings module for the 'celery' program.
os.environ.setdefault('DJANGO_SETTINGS_MODULE', 'simpletask.settings')

app = Celery('simpletask')

# Using a string here means the worker doesn't have to serialize
# the configuration object to child processes.
# - namespace='CELERY' means all celery-related configuration keys
#   should have a `CELERY_` prefix.

app.config_from_object('django.conf:settings', namespace='CELERY')


# Load task modules from all registered Django app configs.
app.autodiscover_tasks()

@app.task(bind=True)
def debug_task(self):
    print('Request: {0!r}'.format(self.request))
Then import the new Celery app to the initialization file so the Celery app will be loaded at the start of the Django project.
simpletask/init.py
from __future__ import absolute_import

# This will make sure the app is always imported when
# Django starts so that shared_task will use this app.
from .celery import app as celery_app

__all__ = ('celery_app',)
To use the Celery Beat, we need to configure the Redis server in the Django projects settings.py file. As we have installed the Redis server on the local machine, we will point the URL to localhost. The CELERY_TIMEZONE variable must be correctly set to run the tasks at the intended times. Redis will act as the broker to pass messages between the Django project and the Celery workers.
simpletask/settings.py
# Celery Broker - Redis
CELERY_BROKER_URL = 'redis://localhost:6379'
CELERY_RESULT_BACKEND = 'redis://localhost:6379'
CELERY_ACCEPT_CONTENT = ['application/json']
CELERY_TASK_SERIALIZER = 'json'
CELERY_RESULT_SERIALIZER = 'json'
CELERY_TIMEZONE = "Asia/New_York"
We run the following command in the main project folder where manage.py file is located to test if the configuration is applied correctly. The -A option indicates the project name while the -l option indicates the log level.
celery -A simpletask worker -l infoRESULT

The above output indicates that the Celery Worker is ready to receive tasks. Next, let us check if the Celery task scheduler is ready. Terminate the Celery Worker and start the Celery Beat using the command below.
pkill -f "celery worker"
celery -A simpletask beat -l info
RESULT

Before moving to the next section, please make sure that both these tasks are terminated.
Celery Tasks
We will create a new Django app called “sendmessage” to add Celery tasks and register the app within the settings.py.
python manage.py startapp sendmessageRESULT

simpletask/settings.py
INSTALLED_APPS = [
    'django.contrib.admin',
    'django.contrib.auth',
    'django.contrib.contenttypes',
    'django.contrib.sessions',
    'django.contrib.messages',
    'django.contrib.staticfiles',
    'sendmessage',
]
Within the “sendmessage” application, we will create a tasks.py file to create Celery tasks. We will be using the @shared_task Python decorator so we can create simple tasks without having a concrete app instance.
sendmessage/tasks.py
from __future__ import absolute_import, unicode_literals
from celery import shared_task
from datetime import datetime

@shared_task(name = "print_msg_main")
def print_message(message, *args, **kwargs):
  print(f"Celery is working!! Message is {message}")

@shared_task(name = "print_time")
def print_time():
  now = datetime.now()
  current_time = now.strftime("%H:%M:%S")
  print(f"Current Time is {current_time}")

@shared_task(name='get_calculation')
def calculate(val1, val2):
  total = val1 + val2
  return total
Celery Worker
The Celery Worker creates a parent process to manage the running tasks. This process handles features like sending messages, registering tasks, tracking task status, etc…
In the following example, we run the Celery Worker for the Django project “simpletask”.
celery -A simpletask worker -l infoRESULT

The above output shows all the tasks we specified in the tasks.py file in the “sendmessage” application.While we can run the celery worker as the main process, this essentially makes the terminal unusable. To mitigate this issue, we can run the Celery worker as a background process using the --detach argument. Let us terminate the current worker using CTRL+C and restart the Celery worker as a detached process with a log file specified to capture the Celery logs.
celery -A simpletask worker -l info --logfile=celery.log --detachRESULT

Testing the Tasks
We can test the tasks by using the Django shell to import the tasks module and call each function as shown below. The delay() method is used to call each task. The delay() method is pre-configured with default configurations and only requires arguments that need to be passed to each function.
python manage.py shell

from sendmessage.tasks import print_message, print_time, calculate

print_message.delay("Hello World")
print_time.delay()
calculate.delay(10,20)
RESULT

Now we will check the celery worker logs. These logs will indicate the successful task executions. Each task can be identified via the name specified with the @shared_task python decorator.
cat celery.logRESULT

Periodic Tasks
Using the celery Beat, we can configure tasks to be run periodically. This can be defined either implicitly or explicitly. The thing to keep in mind is to run a single scheduler at a time. Otherwise, this would lead to duplicate tasks. The scheduling depends on the time zone (CELERYTIMEZONE = "Asia/NewYork") configured in the settings.py
We can configure periodic tasks either by manually adding the configurations to the celery.py module or using the django-celery-beat package which allows us to add periodic tasks from the Django Admin by extending the Admin functionality to allow scheduling tasks.
Manual Configuration
In the following example, we will modify the celery.py file in the simpletask app to do the following,
- Every ten seconds print the Hello message.
- Every twenty seconds print the current time.
- Every forty seconds calculate the total of 10 and 20.
simpletask/celery.py
from __future__ import absolute_import, unicode_literals
import os
from celery import Celery

# Default Django settings module for Celery
os.environ.setdefault('DJANGO_SETTINGS_MODULE', 'simpletask.settings')

app = Celery('simpletask')

# Using a string here eliminates the need to serialize
# the configuration object to child processes by the Celery worker.

# - namespace='CELERY' means all celery-related configuration keys
app.config_from_object('django.conf:settings', namespace='CELERY')


# Load task modules from all registered Django applications.
app.autodiscover_tasks()

@app.task(bind=True)
def debug_task(self):
    print('Request: {0!r}'.format(self.request))


app.conf.beat_schedule = {
    #Scheduler Name
    'print-message-ten-seconds': {
        # Task Name (Name Specified in Decorator)
        'task': 'print_msg_main',
        # Schedule
        'schedule': 10.0,
        # Function Arguments
        'args': ("Hello",)
    },
    #Scheduler Name
    'print-time-twenty-seconds': {
        # Task Name (Name Specified in Decorator)
        'task': 'print_time',
        # Schedule
        'schedule': 20.0,
    },
    #Scheduler Name
    'calculate-forty-seconds': {
        # Task Name (Name Specified in Decorator)
        'task': 'get_calculation',
        # Schedule
        'schedule': 40.0,
        # Function Arguments
        'args': (10,20)
    },
}
After modifying the celery.py file, let us start both the Celery Beat and Worker processes. First, we terminate any currently running workers and then start both services as shown below,
pkill -f "celery worker"
celery -A simpletask beat -l info --logfile=celery.beat.log --detach
celery -A simpletask worker -l info --logfile=celery.log --detach
RESULT

To terminate all running Celery processes, we can use the following command.
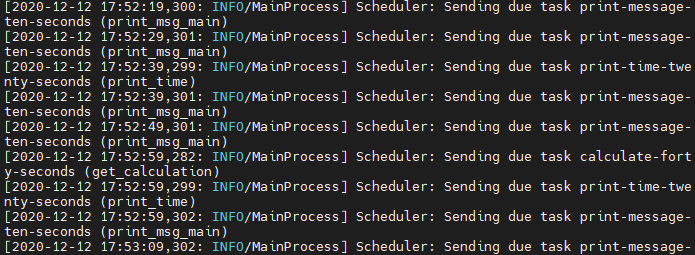
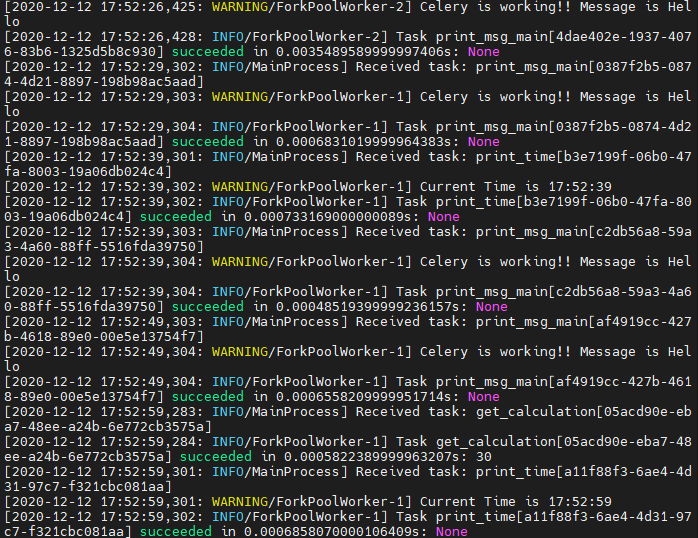
kill -9 $(ps aux | grep celery | grep -v grep | awk '{print $2}' | tr '\n' ' ') > /dev/null 2>&1If we check the log files for the Celery Worker and Beat, we can identify that the tasks are running periodically.
cat celery.beat.logRESULT
cat celery.logRESULT
In the next example, we will create a function in our tasks file in the “sendmessage” app to check the network speed. Then we will modify the celery.py file to execute the task every 10 minutes using a cron job
Install dependency
pip3 install speedtest-clisendmessage/tasks.py
from __future__ import absolute_import, unicode_literals
from celery import shared_task
import datetime
import speedtest
import time

@shared_task(name = "print_msg_main")
def print_message(message, *args, **kwargs):
  print(f"Celery is working!! Message is {message}")

@shared_task(name = "print_time")
def print_time():
  now = datetime.datetime.now()
  current_time = now.strftime("%H:%M:%S")
  print(f"Current Time is {current_time}")

@shared_task(name='get_calculation')
def calculate(val1, val2):
  total = val1 + val2
  return total


@shared_task(name='check_network_speed')
def check_speed_fortmat():
    s = speedtest.Speedtest()
    number_of_times = 0
    while number_of_times < 2:
        time_now = datetime.datetime.now().strftime("%H:%M:%S")
        downspeed = round((round(s.download()) / 1048576), 2)
        upspeed = round((round(s.upload()) / 1048576), 2)
        print(f"time: {time_now}, downspeed: {downspeed} Mb/s, upspeed: {upspeed} Mb/s")
        time.sleep(60)
        number_of_times += 1
simpletask/celery.py
from __future__ import absolute_import, unicode_literals
import os
from celery import Celery
from celery.schedules import crontab

# Default Django settings module for Celery
os.environ.setdefault('DJANGO_SETTINGS_MODULE', 'simpletask.settings')

app = Celery('simpletask')

# Using a string here eliminates the need to serialize
# the configuration object to child processes by the Celery worker.

# - namespace='CELERY' means all celery-related configuration keys
app.config_from_object('django.conf:settings', namespace='CELERY')


# Load task modules from all registered Django applications.
app.autodiscover_tasks()

@app.task(bind=True)
def debug_task(self):
    print('Request: {0!r}'.format(self.request))

app.conf.beat_schedule = {
    # Execute the Speed Test every 10 minutes
    'network-speedtest-10min': {
        'task': 'check_network_speed',
        'schedule': crontab(minute='*/10'),
    },
}
Stop all Celery processes
kill -9 $(ps aux | grep celery | grep -v grep | awk '{print $2}' | tr '\n' ' ') > /dev/null 2>&1Start the Celery beat and worker processes
celery -A simpletask beat -l info --logfile=celery.beat.log --detach
celery -A simpletask worker -l info --logfile=celery.log --detach
Check the log files
cat celery.beat.log
cat celery.log
The output indicates that the “network-speedtest-10min” task is running every 10 minutes as defined in the cron job.
Using django-celery-beat
This extension enables the user to store periodic tasks in a Django database and manage the tasks using the Django Admin interface. Use the following steps to install django-celery-beat in the simpletask project.
Install the django-celery-beat using pip
pip3 install django-celery-beatRESULT

Integrate the app Add the djangocelerybeat app to the INSTALLEDAPPS section in the setting.py file and configure ALLOWEDHOSTS to allow connections to this Django server.
simpletask/settings.py
# Server IP address
ALLOWED_HOSTS = ['10.10.10.55']

INSTALLED_APPS = [
    'django.contrib.admin',
    'django.contrib.auth',
    'django.contrib.contenttypes',
    'django.contrib.sessions',
    'django.contrib.messages',
    'django.contrib.staticfiles',
    'sendmessage',
    'django_celery_beat',
]
Run Migrations
python manage.py migrateRESULT

Reset database scheduler Changing time zone related settings will not change the time zone settings in the database scheduler. We need to manually reset the database scheduler time zone settings to identify the changes we have made while migrating. To reset the time zone settings, we use the Django shell to run the following commands.
python manage.py shell

from django_celery_beat.models import PeriodicTask
PeriodicTask.objects.update(last_run_at=None)
exit()
RESULT

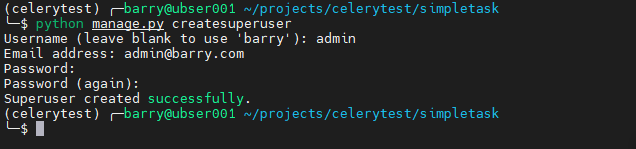
Create Django Admin user
python manage.py createsuperuserRESULT
Start the Django Server
python manage.py runserver 0.0.0.0:8000RESULT

Access the Admin interface Using the newly created credentials, we can access the Django admin interface. Then we add a periodic task called “Print time every 30 seconds” from the “Periodic Tasks” section. Any task we have defined in the tasks.py file will be automatically shown in the registered task dropdown.
Add periodic task screen

Periodic task list

Terminate any running Celery processes
kill -9 $(ps aux | grep celery | grep -v grep | awk '{print $2}' | tr '\n' ' ') > /dev/null 2>&1Start Celery worker and beat
celery -A simpletask worker -l info --logfile=celery.log --detachWe will define the --scheduler argument to indicate that the scheduled tasks are within the database. We will be using a different terminal instance for these commands as we are currently running the Django server in the original terminal instance.
celery -A simpletask beat -l info --scheduler django_celery_beat.schedulers:DatabaseSchedulerRESULT

Check the Logs
cat celery.logRESULT

The above output shows us that the Periodic Task created from the Django Admin interface is being successfully executed every 30 seconds.
Final Thoughts
In this tutorial, we gained a basic understanding of the Celery module functionality. When creating scalable web applications, Celery provides a task queue with real-time processing and task scheduling functionality, which are absent in the core Django framework. Celery modules Periodic Task functionality allows developers to automate repetitive tasks from within a Django project.