
How to Build a LinkedIn Bot with Python and Selenium
LinkedIn is a well-known professional social networking platform that hosts more than 600 million professional profiles. It supplies an unlimited number of network connections among professionals all around the globe. This social platform has become an important part of being a full-fledged professional in any industry these days.
However, sending connection requests and accepting pending invitations manually one by one can be hectic and a little annoying sometimes. It would be great to have a bot to do these processes instead of doing it manually. But how can we do that?
Don't worry as Python comes to help us.
In this article, we are going to learn how to build a basic bot that can accept our LinkedIn connections, request new connections, and take useful screenshots and save for future usage.
We can easily improve this LinkedIn bot to accept invitations sent by professionals who satisfy specific conditions. As an example, we can use this improved Bot to accept only "Software Developers" among the pending invitations.
We can schedule to run this Bot every day at a specific time, using the Windows task scheduler. If you need to run this in the background, you can simply use the headless chrome browser without any graphical user interface. But since we need to visualize the steps, we will use the normal chrome browser with a graphical user interface.
Requirements
In the implementation, we will be using two libraries in Python.
- Selenium
- Pyautogui
Now let's take a look at what Selenium and Pyautogui are.
Selenium
Selenium is a powerful web automation library. It is used to automate the testing across different web browsers such as Chrome, Operamini, Firefox, etc. In our tutorial, we will be using Selenium to automate the Bot's activities. You can use any web browser for implementing this Bot. I will use Chrome in this tutorial as it is by far the most popular browser.
Selenium is not a built-in library in Python. Because of that, we should install Selenium by running the following command in the terminal.
pip install selenium
Now, the Selenium python library is installed in your environment. You can further read about the Selenium library in Python through this link.
Pyautogui
PyAutoGui is a cross-platform Python module that is used for GUI automation. It is used to programmatically control the keyboard and mouse. PyAutoGUI is also not a built-in library in Python. So you have to install the PyAutoGUI Python module the same as Selenium by running the following command in the command line or in the terminal.
pip install pyautogui
You can further read about this Pyautogui module from here.
Implementing this Bot requires to have
- A LinkedIn account
- Chrome Web Browser
- Chrome WebDriver
Assuming that, currently, you have a LinkedIn account and Chrome Web browser, let’s move forward. The purpose of having Chrome WebDriver is to enable Selenium to connect with the Chrome browser. If it is not currently installed on your machine, you can download it from here.
Note: The location of the installation library of Chrome WebDriver will be needed in the implementation.
Developing the Bot
It's time to start coding. By now, we have installed Selenium and Pyautogui modules in our environment. In this tutorial, we will be implementing the following methods for LinkedIn bot.
- Log in to the LinkedIn account
- Navigate to the network page
- Accept the connection invitations
- Send Connection invitations to users
- Take Screenshots and save for future reference. Let’s develop the bot step by step.
Defining Variables in the main method
First we need to define three variables to store LinkedIn base URL, network page URL and the web driver as follows.
def  main():
  url =  "http://linkedin.com/"
  network_url =  "http://linkedin.com/mynetwork/"
  driver = webdriver.Chrome("C:\\Program Files\\WebDriver\\chromedriver.exe")
  start_bot(driver,url,network_url)
For the web driver, it is required to import thewebdriver module from Selenium as follows.
from selenium import webdriverWhen defining the driver variable, you should specify the correct installation folder which has been installed on the chrome web driver.
[Note: In python \ character is an escape character. You need to add an extra \ character to print one \ ]
The last line, start_bot is a method that will be implemented later in this tutorial.
First of all, the Bot should navigate to LinkedIn base URL www.linkedin.com. It can be done easily using the following code line. When executing this line, it automatically opens the chrome browser and navigates to the given URL held in the URL variable.
driver.get(url)
Log in to the LinkedIn account.
Now, our bot needs to login to the existing LinkedIn account giving correct credentials. Following code is responsible for the login process.
def login_to_linkedin(driver):
  username = driver.find_element_by_id("session_key")
  username.send_keys("Your Email Goes Here")
  password = driver.find_element_by_id("session_password")
  password.send_keys("Your Password Goes Here")
  driver.find_element_by_class_name("sign-in-form__submit-button").click()
Let's take a look at this code. What the find_element_by_id method does is, finding the particular element in HTML, which the id attribute is equal to session_key.
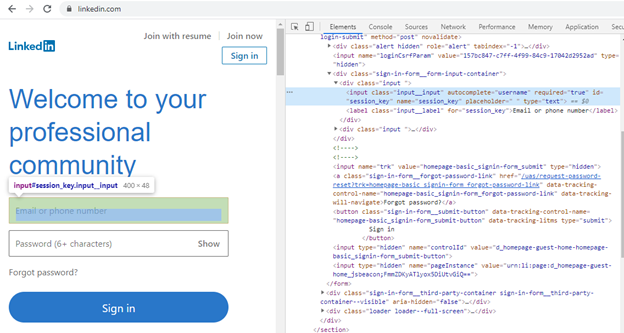
As you can see in this image, the id attribute of the first input box is session_key. Our Bot should write the email address in this input box. Then it sends this email address using the send_keys method.
Likewise, the Bot finds out the input box where the password has to be placed and sends that password to the input box.
The Bot, then, is required to click the Sign In button. For that, we find the HTML button element using the class name and perform a click event with the click() method.
Now our Bot is done with login. If the credentials are correct, it navigates to the LinkedIn homepage.
Navigating to the Network page
Next, we need our Bot to navigate to a network page on LinkedIn, which contains all the connection details, invitations, and connection suggestions. Same as how we navigated to the LinkedIn base URL, we can navigate to the network page using the get() method.
def  goto_network_page(driver,network_url):
  driver.get(network_url)
Sending requests to users
If the previous step is successful, now our Bot is on the LinkedIn network page, which holds the URL http://www.linkedin.com/mynetwork. We can connect with the professionals or the users who have been suggested by LinkedIn with the following method.
def  send_requests_to_users(driver):
  WebDriverWait(driver, 60).until(
    EC.presence_of_element_located((By.CLASS_NAME, "class name of an element"))
)
  javaScript =  "window.scrollBy(0,4000);"
  driver.execute_script(javaScript)
  n =  int(input("Number of requests: "))
  for i in  range(0, n):
    pag.click(441, 666)
  print("Done !")
Let's understand what this code snippet does. First, it calls an important method, WebDriverWait. This is not a built-in function in Python. Because of that, we need to import it from the Selenium web driver as follows.
from selenium.webdriver.support.ui import WebDriverWaitIf our Bot performs various events such as click, before completely loading a particular page, there is a potential to occur exceptions such as NoSuchElementException. To avoid that problem, we need to wait until the page is completely loaded.
For that, the program can be implemented to wait a predefined number of seconds before moving to the next code line, using the time.sleep(#of_secs) method. Then why do we need this WebDriverWait method?
Let's say that the program is implemented to wait a predefined number of seconds (as an example, 60 seconds ), and if sometimes the web page completely loads within 10 seconds, there is a wastage of 50 seconds of time, which the program waits uselessly. But if you use the WebDriverWait method, you will wait the exact amount of time necessary for your element or data to be loaded.
After loading the network page, our Bot needs to scroll down on the page because the connection suggestions are in the middle of the page. This scrolling event can be performed by windows. scrollTo(x_cordinate, Y_cordinate) method. But the above-mentioned code line is not written in Python. So we need to inform the Python compiler that you are going to execute a JavaScript code using the execute_script('Javascript code lines') method.
Then our Bot takes a user input to identify how many connection requests are needed to be sent. We can set it as a predefined number, or we can give it as a user input according to the user's preference. Then The Bot will click the Connect button according to the number which the user has input.
In this tutorial, we import the Pageautogui module, which has installed at the beginning as pag, as follows
import pyautogui as pagWhat the pag.click(x_cordinate, y_cordinate) method does, clicking the specific location given by the x and y coordinates. But this location can vary from profile to profile. You need to customize these x and y coordinates according to your GUI.
Taking screenshots
Next we are going to develop the method which is used to take screenshots for our LinkedIn bot. The following code implements it.
def  take_a_screenshot(driver):
  loc_time = time.localtime()
  time_string = time.strftime("%m/%d/%Y", loc_time)
  driver.save_screenshot(time_string+"_screenshot.png")
When this Bot takes a screenshot, it will save screenshots in the same folder where the file of the above code resides. When this Bot takes screenshots daily, there may occur a problem to classify which screenshots are taken today, yesterday and etc.
As a solution, we can append the date on which the screenshot is taken to the name of the image file. As an example, if this Bot takes a screenshot on 10/11/2020, then the name of that image file will be "10/11/2020_screenshot.png".
To implement that, we need to import the time module as follows.
import timeThen we can get the local time with the time.localtime() method and extract the month, day, and year, and convert it to a string using the strftime ( pattern, local time) method. Screenshot can be taken with the save_screenshot("image filename") method.
Accept Connection Invitations
We give our bot the ability to accept connection invitations as well. This is how we can implement that scenario.
def  accept_invitations_from_users(driver):
  javaScript =  "window.scrollBy(0,0);"
  driver.execute_script(javaScript)
  element_exists =  True
  while element_exists:
    try:
      driver.find_element_by_class_name("invitation-card__action-btn")
    except NoSuchElementException:
      element_exists =  False
    finally :
      if element_exists:
        driver.find_element_by_class_name("invitation-card__action-btn artdeco-button--secondary").click()
Because the connection invitations are located at the top of the page, the Bot needs to scroll up on the page. We can implement it by using the window. scrollBy (x coordinate, y_coordinate) script and executing it in python with the execute_script(script) method.
Before accepting invitations, Bot should check whether there exist connection invitations for the user. We can decide that by the presence of the invitation card element or the invitation accepting button element. When the Bot tries to find the particular element, and if the element is not present, it generates a NoSuchElementException exception. If such an exception occurs, Bot understands that there are no more connection invitations in the account. If connection invitations are present, the Bot gets that element and clicks on the accept button. This click event can be implemented with peg. click ( x_coordinate, y_coordinate) method as well, as illustrated in a previous method.
Combining methods
Next we have to collect and connect the methods we implemented so far to create the bot. For that we can call methods that have been implemented one by one as follows.
def  start_bot(driver,url,network_url):
  driver.get(url)
  login_to_linkedin(driver)
  goto_network_page(driver,network_url)
  send_requests_to_users(driver)
  accept_invitations_from_users(driver)
Task Scheduling
Now we are almost done in implementing our basic LinkedIn bot. If we need to execute this script daily at a specified time, as an example, if a user needs to execute this Bot every day at 8.00 am, we can do that by using Task schedulers. It takes only five simple steps to do it in Windows.
First, you should search for the Task Scheduler GUI and create a new task. Next, create an action with the "New" button. Now you need to add the Python exe file (Executable file) to the program script and then add the path to the python script in the arguments. Finally, trigger the script execution. Here you can select the repetition you need to execute, such as daily, weekly, monthly basis.
Final Thoughts
So, we have reached the end of the tutorial. This is how we can develop a LinkedIn bot using Selenium and PyAutoGUI modules. Feel free to add new functionalities and improve the LinkedIn bot to perform advanced activities such as replying to LinkedIn messages, applying for LinkedIn jobs, and gathering information about interesting events posted on LinkedIn.