
Blog Like A Hacker: Build Your Website Using Jekyll, GitHub Pages and AWS
I have been writing on the Internet in some capacity since 2014. This article explains by current blogging setup, which is excellent for anyone that wants a minimalist blog template combined with the version control capabilities of GitHub.
My Background as a Writer
I have been writing on the Internet in some capacity since 2014.
My first website was www.financialcanadian.com (which no longer exists), a financial education blog for Canadians that I started writing while I was an investment management intern at the Toronto-Dominion Bank. That website was built using the Wordpress content management system (CMS) and hosted on Bluehost. I chose Wordpress for its ease of use and Bluehost for its low cost.
After that, I joined Sure Dividend as President and, later, Chief Technology Officer. That website also used the Wordpress CMS. On several side projects, I have also experimented with Wix, Squarespace, Django, Sanity, and Webflow.
All in all, I have experience with most of the major blogging platforms. For a basic blog like this one whose primary purpose is to share ideas, each one of these content management systems presented problems:
- Some were slow because of the wide array of plugins required to make them work like I wanted.
- Most relied on technologies that I was unfamiliar with (like PHP), which made customizing my templates difficult. It was not worthwhile to learn these technologies for the sole purpose of customizing my theme.
- All lacked an easy-to-use version control system that allowed me to see how my blog posts were modified over time, and allow the public to suggest changes in a centralized location.
- After working with and on open source software, I wanted the ‘GitHub’ of blog content.
I have now set up a blog publication system that solves each of these problems. This article will explain how.
Requirements
To use the “Blog Like A Hacker” system, some preliminary knowledge is required:
- Git and GitHub
- Markdown (very easy to learn if you’re not familiar - Wes Bos’ free Mastering Markdown course is a good place to start)
- Amazon Web Services - just the basics
If you’ve worked with these tools in the past - or are prepared to learn them - please read on!
Step 1: Fork the Barry Clark’s Jekyll-Now template
Much of the system I am describing in this blog post is possible because of the work of Barry Clark.
When I originally stumbled upon Barry Clark’s website, I immediately recognized that his site was exactly what I was looking for in my own blog. It was simple, minimalist, and easy to read.
Fortunately, I discovered that he open sourced the code for his blog. The template is called Jekyll Now and it allows you to use the Jekyll static site generator to create a blog in about 30 seconds.
To implement the ‘Blog Like A Hacker” system, you’ll need to start by forking Barry’s Jekyll Now repository. Once that is done, some modifications will be required to make the template fit your specific needs.
Step 2: Modify the Jekyll Now Theme to Fit Your Own Website
There are various attributes within the Jekyll-Now theme that will need to be modified for your own website. For starters, I recommend modifying the README.md. You’ll also need to change the contents of the _config.yml file, specifically:
- Name
- Description
- Avatar
- Social links
You’ll also want to modify the _layouts/default.html file to change your navbar. For example, I modified this file to add my email newsletter to the navbar across my entire website.
Once you have modified all of your settings, you can actually publish your blog posts as Markdown files within the _posts directory of the forked GitHub repository. The Jekyll-Now template has a “Hello World” blog post as an example:
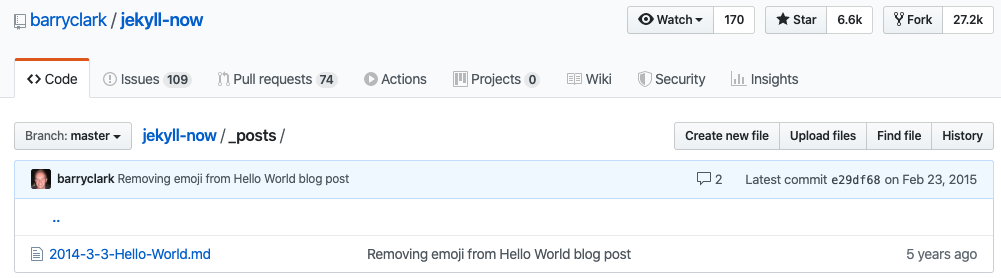
Within that Markdown file, you can see an example of how the post title is configured at the top:

One last thing - if you already have an existing site hosted on Wordpress (like I did), you’ll want to use a tool to export all of your existing posts. I used Ben Balter’s Wordpress to Jekyll Exporter and it worked flawlessly.
Next up, I’ll explain how to purchase your domain name and connect it to your website’s source code on GitHub.
Step 3: Buy Your Domain Name
To host your blog, you’ll first need to own a domain name. If it is a purely personal blog (like this one) I recommend something like firstnamelastname.com (if it’s available).
Once you’ve decided on a website name, you’ll need to purchase it. I personally use Amazon Web Services’ Route 53 service to buy my domains. It is affordable and it allows me to simplify my vendor management since I already use AWS for compute (EC2) and file storage (S3). If you don’t have existing expenses with AWS, it makes more sense to use Bluehost or GoDaddy.
Purchasing a domain from one of these vendors should be fairly simple. Once that is completed, you will need to change your DNS records.
Step 4: Change Your DNS Records
DNS records point your website at an IP address that is used to serve content over the Internet. For the purpose of this tutorial, we will change our domain’s DNS records to point to the IP address that GitHub Pages will render our content to.
In the portal of the company you used to purchase your domain name, navigate to their DNS section. Create an A record that points to the following IP addresses:
185.199.108.153
185.199.109.153
185.199.110.153
185.199.111.153
As an example, here is the A record for nickmccullum.com within my AWS Route 53 account:

Once this is done, the final step is to activate GitHub Pages from within your GitHub repository.
Step 5: Activate GitHub Pages
The last step to implement the ‘Blog Like A Hacker’ methodology is to activate GitHub Pages. This step is very quick.
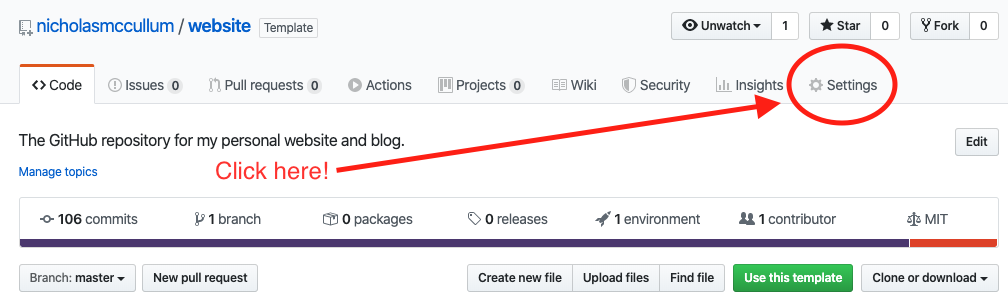
First, navigate to the repository where your blog is saved. Then, click settings on the right hand side of the screen:
Scroll down to the GitHub Pages section, and fill in your information. When completed, it should look something like this:
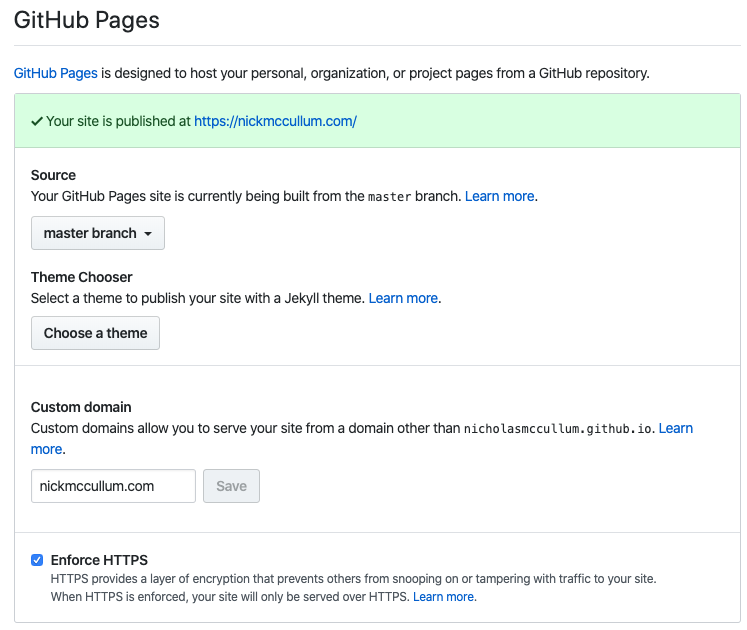
After this, your site should be live!
One Last Thing - How To Write Blog Posts
One aspect of using the Blog Like A Hacker system that I haven’t mentioned is how to productively write blog posts. Since this template takes in Markdown files and most people prefer to write in plain English, there is an input/output mismatch.
Fortunately, I stumbled upon a great solution. I now write all of my blog posts in Google Docs and then use the Docs to Markdown add-on to easily convert them and upload them to GitHub.
Overall, I’m very pleased with my new blog setup. If I missed any steps along the way, please email me. You can also check out the GitHub repository that I use for my website. I want this tutorial to be as comprehensive as possible and would love to implement any feedback that you have.